

Special thanks to MayaR-31 for testing this and sharing her thoughts.
Wattpad is not a word processor, cloud drive, backup drive, or text editor. I feel like I'm stating the obvious. But after reading the hundredth "Wattpad deleted my account and I lost all my stories" tear-jerker, I think this bears repeating.
Not a word processor.
I know. You’ve got ten WIPs and three completed stories. Wattpad doesn’t offer any easy options. There isn’t an export this chapter button, let alone one for exporting the entire book. If thinking about spending days, possibly weeks, of your precious writing time copying and pasting all those chapters has you reaching for the chocolate, I feel your pain.
What if I told you that you could migrate a 90,000 word 70 chapter novel in only a few hours? The end result lets you pick your poison. A text editor, Word, Libre Office, Google Docs...Choose one or two---preferably with both cloud and local storage so you can work on the go---and take back control of your writing process.
Method Origins
Self-publishing is my chosen path. Since I’m not pursuing traditional publication for First Apprentice nor am I interested in the Kindle Unlimited program, the first publication rights were less valuable to me. When questions arose about my book's unique magic system and possibly marketing it as new adult, I began looking for fantasy-loving beta readers in the target demographic.
Wattpad has millions.
Making an unedited beta book public wasn’t an easy decision, but I felt like this was the right choice before I poured more time and resources into this monster.
Now, if you look up control freak in the dictionary, you'll find my picture. In the middle of my test run, Wattpad experienced multiple outages. Meanwhile, my friendly readers were pointing out issues like the quacking ground. I realized I needed a way to back up their comments so I could use their feedback regardless of Wattpad’s server status. I figured this out about a year ago and never wrote it up because I honestly didn't think anyone else needed it.
I recently learned that I was wrong.
This method uses Zotero snapshots because I can open those snapshots in a browser and read the comments without internet access. Since it’s on my laptop and not in an app, I can view the comments and my master document side by side, which creates a better workflow.
Obligatory Disclaimer: Using this method to save a story that isn't yours is copyright infringement.
Tools
Zotero
If you're in school or you write white papers for a living (raises hand), a reference manager like Zotero is an indispensable tool in your arsenal. Learning to use it will save you hours.
For this, we don't need references. We need Zotero snapshots.
For now, download and install both Zotero and Zotero Connector, which is the browser extension.
Pandoc
Pandoc is a Swiss army knife for documents. Do you need to make all your straight quotes curly? Pandoc. Combine thirty individual chapter files into a single document? Pandoc. Convert said document into a valid epub? Again, pandoc.
Note, this is not a pandoc tutorial. If you want one, drop me a line in the comments.
Yes, I'm a total pandoc fangirl.
Download and install it. If you see a checkbox asking if you want to install shell commands, check it.
Step One: Archive Your Story
1. Open Zotero on your desktop.
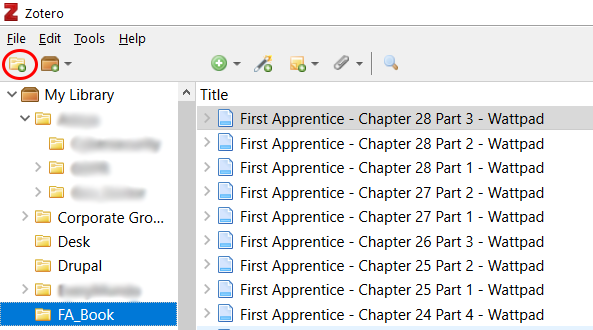
2. Click the folder icon to create a new folder for your story, name it, and click the folder. Do not close Zotero.
3. Using your desktop or laptop web browser, not the app, open the first chapter of your book. For speed reasons, use "view as reader."
4. Click the "Save to Zotero" icon beside the address bar.

5. Go to the next chapter and repeat 3 and 4 for each chapter.
Step Two: Copy Your Story to a Working Directory
1. After adding all your chapters to Zotero, go to Zotero and scroll down to the first chapter.
2. Click the arrow to the left of the item and then right-click on the snapshot below it (camera icon). Select "show file."
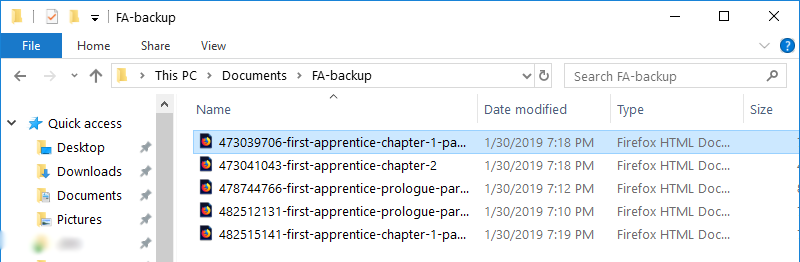
3. When the file browser opens, copy the pre-selected HTML file to another folder. For example, Documents > Book_Title.
Never edit the originals!
4. After the first one, click "storage" in the file browser. Then sort the folders by date. Select the folder immediately above the first folder. Copy its file. Then go back to storage and repeat.
Step Three: Clean Up the HTML and Convert to Docx
Enter Your Book's Directory
1. On Windows, open PowerShell. Fire up the terminal if you're on a Mac or Linux.
If you're a command line warrior, go ahead and cd into the directory. If you're not, don't let the blinking cursor of doom freak you out. Open your file browser and note everything after the phrase "This PC." Don't try to enter everything all at once. It's faster; however, if you make a mistake, you have to type everything over again. Not fun.
2. For each step in the directory, type the following and press enter.
cd directory_nameFor example, I would type:
cd DocumentsIf your directory name has spaces like my OneDrive does, use quotes. For example,
cd "This is My Documents"Press enter. Then,
cd FA-backupHit enter again. Keep doing this until the directory to the left of the blinking cursor matches your working book directory.
Strip Out the Fluff
Now that you're in your book directory, you need to strip out all the unnecessary fluff from the HTML files. You don't need things like JavaScript, book recommendations, and Amazon advertisements in your working files. Everything you didn't write must die.
Windows
Paste the following commands into Powershell. Each command is copy and pasted as one giant chunk. After pasting, hit enter.
1. Remove all unnecessary spaces, tabs, and new lines. These make Wattpad's code easier for their developers to read. Unless you plan on editing your book in HTML code---in which case, you don't need a tutorial---you probably don't care if their code looks pretty.
gci -r -i *.html | `
foreach{ `
$html=$_.directoryname+"\"+$_.basename+".html"; `
(Get-Content $html) -join "`n" | Foreach-Object {
$_ -replace '[\t\r\n]', '' `
} | Set-Content $html }
2. Then, delete all the HTML bits and bobs. At the end of this, your document will have no images, Wattpad related headings, comment counts, or scripts. All you'll have left is your chapter title, paragraphs, and any bold or italic text.
gci -r -i *.html | `
foreach{ `
$html=$_.directoryname+"\"+$_.basename+".html"; `
(Get-Content $html) | Foreach-Object {
$_ -replace '\s{2,}',' ' `
-replace '<head>.*</head>', '<head></head>'`
-replace '<script(.*?)</script>', ''`
-replace '<body(.*?)style="">', '<body>'`
-replace '<body(.*?)<h2', '<body><h2'`
-replace '<div class="story-stats(.*?)<pre>', ''`
-replace '<span(.*?)</span>', ''`
-replace '</span>', ''`
-replace '</pre>.*</body>', '</body>'`
-replace ' </p>', '</p>'`
-replace ' </p>', '</p>'`
-replace '<p data-p-id(.*?)">', '<p>'`
-replace '<figure(.*?)</figure>', ''`
} | Set-Content $html }Mac and/or Linux
This is not a pretty bit of code. It could be cleaner. Okay, a lot cleaner. That said, it worked on my Ubuntu (Linux) machine. It should work on your Mac, but I haven't tested it on one.
You may be wondering why I didn't use sed. My solution uses non-greedy quantifiers. If that sounds like Greek, don't worry.
Copy and paste the below as one chunk. Then hit enter. This strips the HTML document you saved in the Zotero step above down to its bare essentials.
for f in *; do tr -d "\n" < $f > temp.html && mv temp.html $f; tr -d "\n\r" < $f > temp.html && mv temp.html $f; perl -0777 -pe 's|\s{2,}||g' < $f > temp.html && mv temp.html $f; perl -0777 -pe 's|<head>.*</head>|<head></head>|' < $f > temp.html && mv temp.html $f; perl -0777 -pe 's|<script(.*?)</script>||g' < $f > temp.html && mv temp.html $f; perl -0777 -pe 's|<body(.*?)style="">|<body>|' < $f > temp.html && mv temp.html $f; perl -0777 -pe 's|<body(.*?)<h2|<body><h2|' < $f > temp.html && mv temp.html $f; perl -0777 -pe 's|<div class="story-stats(.*?)<pre>||' < $f > temp.html && mv temp.html $f; perl -0777 -pe 's|<div id="sticky-nav(.*?)<pre>||' < $f > temp.html && mv temp.html $f; perl -0777 -pe 's|<span(.*?)</span>||g' < $f > temp.html && mv temp.html $f; perl -0777 -pe 's|</span>||g' < $f > temp.html && mv temp.html $f; perl -0777 -pe 's|</pre>.*</body>|</body>|' < $f > temp.html && mv temp.html $f; perl -0777 -pe 's| </p>|</p>|g' < $f > temp.html && mv temp.html $f; perl -0777 -pe 's| </p>|</p>|g' < $f > temp.html && mv temp.html $f; perl -0777 -pe 's|<p data-p-id(.*?)">|<p>|g' < $f > temp.html && mv temp.html $f; perl -0777 -pe 's|<figure(.*?)</figure>||g' < $f > temp.html && mv temp.html $f; doneCreate Markdown Files
When the Smithsonian talks about archiving text documents, they mean preserving files in PDF/A or PDF format. PDFs are made for reading, not editing. Although it's possible to work with the PDF document and make alterations, it's not a simple task. That's why they also recommend secondary preservation formats, namely RTF, TXT, and XML with schema.
Now, I'm not talking about preserving your book so you can stick in on a library shelf. I'm talking about converting your book into files that you can both read and edit. Preferably, files that you can edit 20 years in the future.
Although RTF is a robust format, it's not exactly human readable. Here are the first few paragraphs of this section.
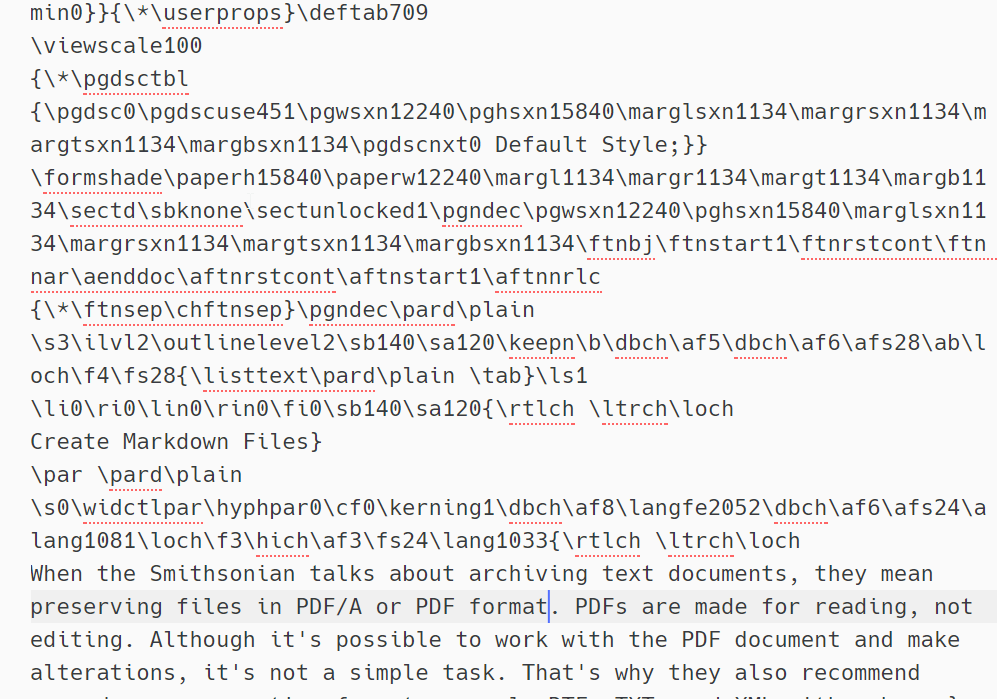
It looks like gobbledygook.
That's why I recommend plain text files with minimal markup that preserves most formatting, including tables, images, bullets, footnotes, and emphasized text. In other words, markdown is king.
(So are AsciiDoc, Textile, and reStructuredText!)
As you adapt this process to your workflow, keep in mind that formats like docx and odt are subject to change. In a pinch, you can unzip these files and open them in a text editor. However, there is no guarantee that you will be able to open the file formats in your word processor 20 years from now.
Windows
1. Paste the following command into Powershell. This uses pandoc to convert all HTML files in the directory into markdown files. This is one of my favorite snippets. I use it all the time.
gci -r -i *.html |foreach{$md=$_.directoryname+"\"+$_.basename+".md";pandoc -f html -t markdown_strict --atx-headers --wrap=none $_.name -o $md}
Mac and/or Linux
for f in *.html; do pandoc -f html -t markdown_strict --atx-headers --wrap=none "$f" -o "${f%}.md"; done
Create DOCX files
Just because I'm using docx above doesn't mean you have to! Pandoc churns out rtf, odt, epub... Yes, pandoc can take your mountain of chapter files and create a beautiful and, most importantly, valid epub. That's way beyond the scope of this tutorial. To change the output format, search for docx in the command below and replace it with odt, rtf, etc.
Windows
gci -r -i *.md |foreach{$docx=$_.directoryname+"\"+$_.basename+".docx";pandoc -f markdown+smart -s $_.name -o $docx}
Mac and/or Linux
for f in *.md; do pandoc -f markdown+smart -s "$f" -o "${f%}.docx"; done
The End Result
Congratulations! You survived the tutorial and seized control over your Wattpad stories. I hope. If you haven't, now sounds like a good time to get started.
Your finished product should look something like this.
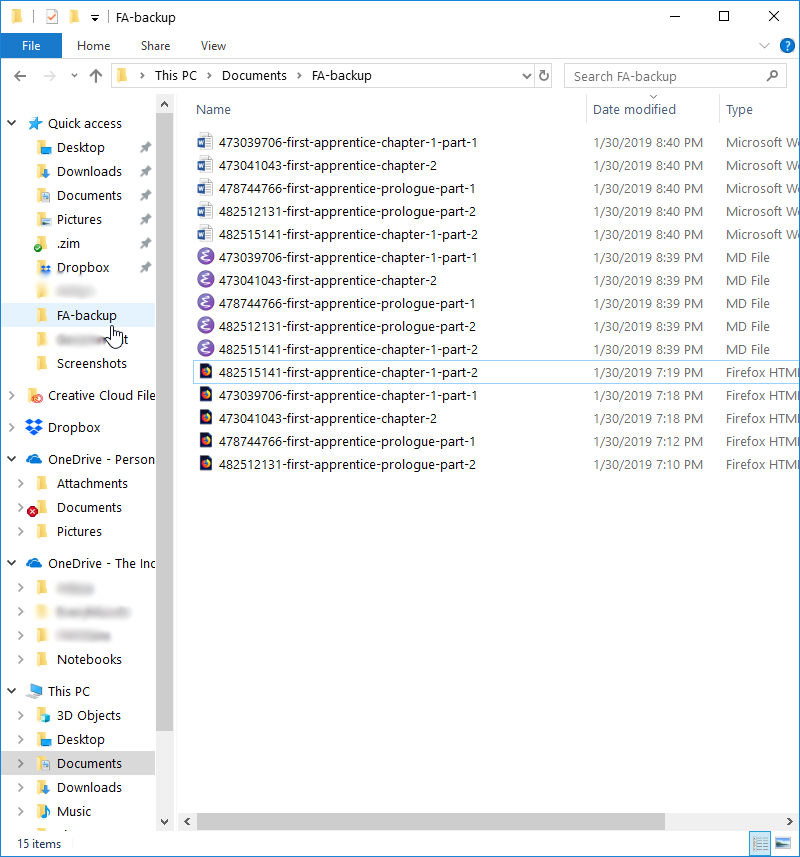
This preserves the Zotero numbers, which helps when you go to seperate out your current chapters from draft chapters. You may need to rename and organize your files before you get back to work.
Now that you have working copies of your files, it's time to rethink your writing process. What file format will you work in? Which program(s) and/or apps? Local only or cloud only or both? What about version control?
Here's a hint. In the end, your workflow should like this.
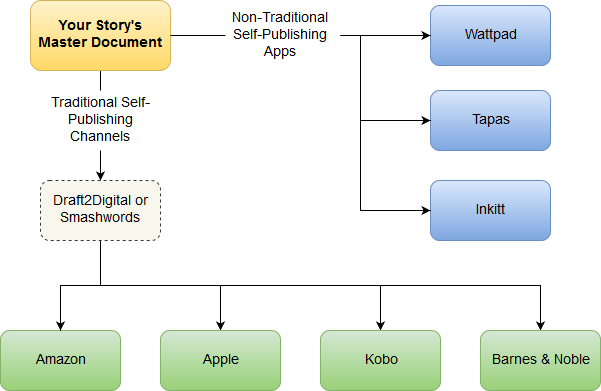
My preferences are as follows:
- Preferred file format: txt
- Preferred markup language: markdown
- Favorite Desktop Program for Writing: Emacs
- Second Favorite Desktop Program for Writing: Atom
- Favorite Writing App: Jotterpad
- File Location: Cloud and Local
- Version Control: private gitlab repository
What are yours?